
Disclosure: I'm an Adobe Firefly Ambassador, and Adobe sponsored the video this article is based on. All opinions and demonstrations are my own. Nothing here was scripted or requested by Adobe.
If you've opened Adobe Firefly recently and felt momentarily lost, you're not imagining it. Tools have moved. Panels have been reorganised, and two significant additions have been made — the AI Assistant and Firefly Studio (both in beta at the time of writing this).
This isn't a guide to writing better prompts. There are plenty of those. This is a walkthrough, showing you where every tool now lives, what each section actually does, and what's changed. By the end, you'll be able to navigate Firefly without hunting through menus.
Let's start with the thing most people are looking for.
Firefly Studio (Beta): the biggest change
Studio is the newest addition and, for most people, the most significant. You can reach it from the home page, or by toggling the beta option that appears at the top of the image and video generation windows.
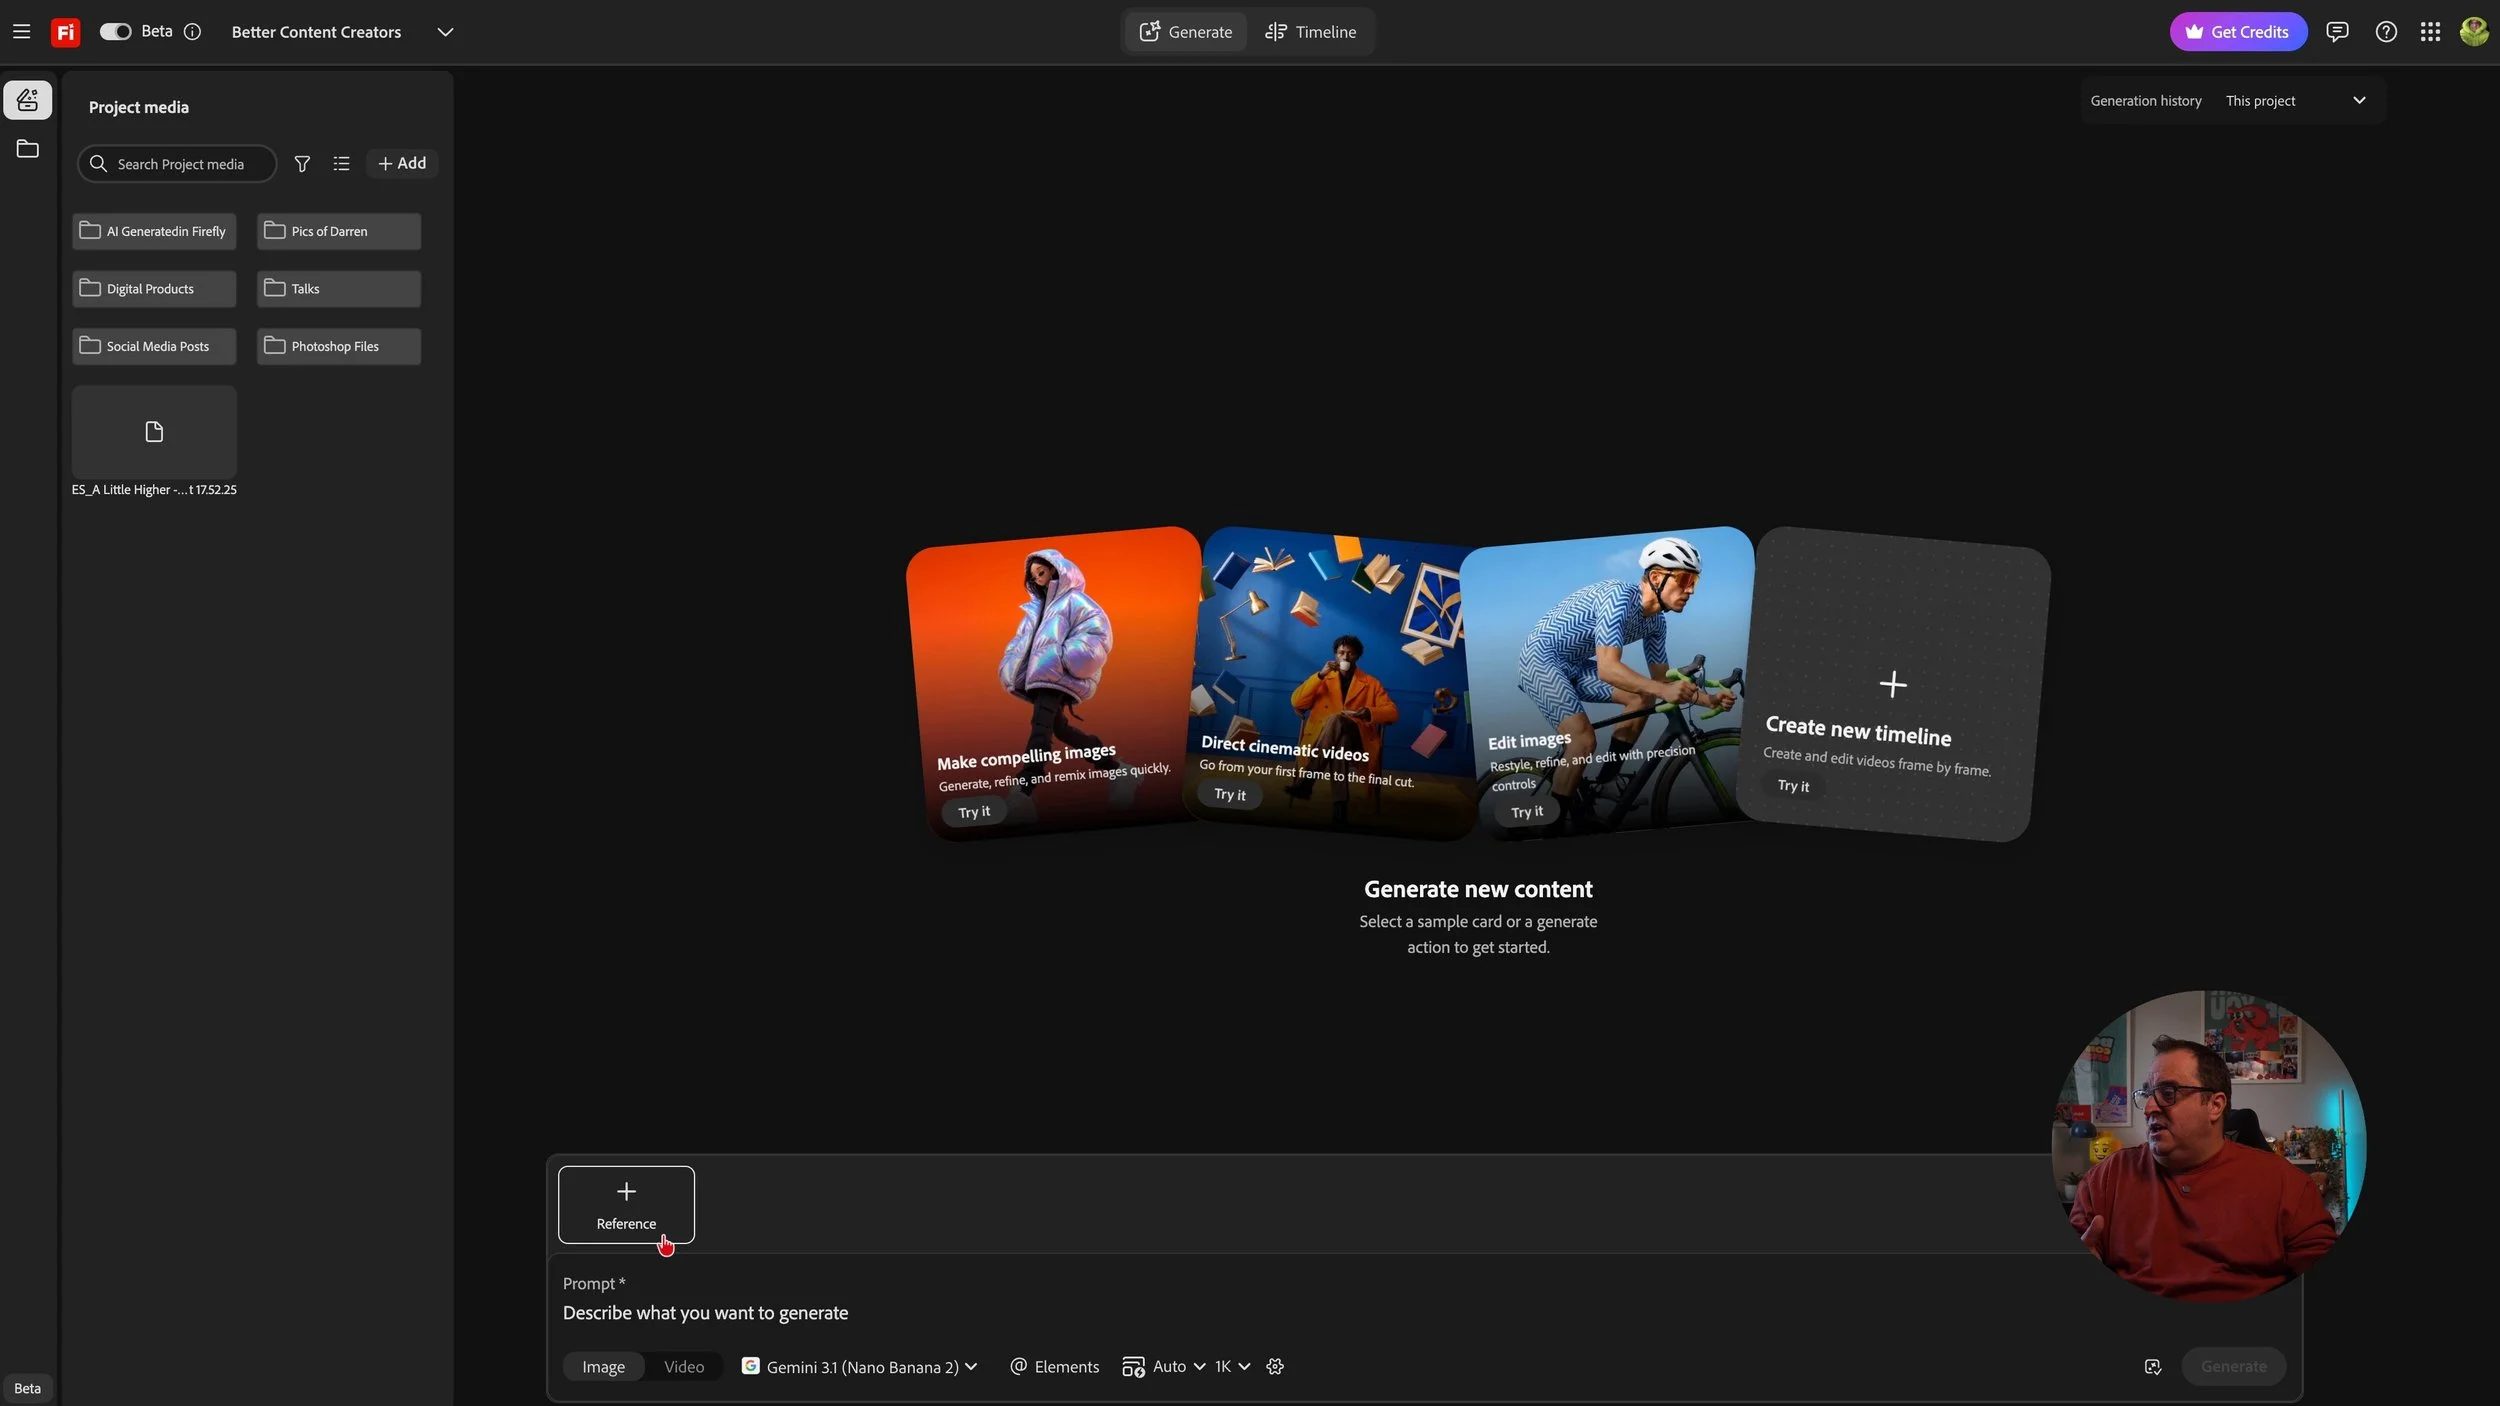
Adobe Firefly Studio Homepage
Studio pulls generation into a single workspace. You can attach project media, add reference images, write your prompt, switch between image and video, and choose which partner model to use — all without leaving the panel.
Elements in Firefly. This is Firefly Studio's answer to the consistency problem that users have been asking for: Solving teh problem where you generate a character you love, then can't reproduce them in the next shot.
Click Create Element to make one. An element can be a character, a location, or an object. Once created, use Manage Elements to see everything you've built and make tweaks if needed.

Adobe Firefly Studio Element Setup
The clever part is how you use elements in Adobe Firefly Studio. When you are writing a prompt, type @ and reference your saved elements directly. Firefly then treats those as fixed references, so the same character appears in the same location across multiple generations. Want the same room but a different character in it? Swap the character element, keep the location element, regenerate.

How to @ Elements in Firefly Studio
Studio also keeps a generation history down the side, with a toggle to switch between this project and all. Click any previous generation and you can see the reference image and prompt that produced it, then hit Load All to pull those settings back in and iterate.
One limitation worth knowing: Studio is in beta and will likely look different by the time you read this. There's also no way to favourite items within the generation history yet, which becomes awkward once you've built up a long list.
The left-hand panel: your map
Everything in Firefly is reachable from the left-hand navigation. Top to bottom:
Image — generate and edit images
Video — generate and edit video
Audio — speech, sound effects, and music
Discover — what other people are creating
Boards — ideation and storyboarding
Timeline — the built-in video editor
AI Assistant — conversational editing (beta)
Production — bulk actions
Custom Models — train on your own work
Files — everything you've made

Adobe Firefly Lefthand navigation
Above all of this sits a bar for jumping between Adobe programs. You can collapse it with the small icon at the top if you want a cleaner workspace, and reopen it the same way. Promotional offers occasionally appear here too.
The home page
The centre of the home page has a quick generation box. Toggle between image and video, pick your model or partner model, set your aspect ratio, and either generate immediately or click More to open the full generation window.

Adobe Firefly Homepage
Below that are prompt starters grouped by category — landscapes, marketing and social, cinematic, illustration, portraits. Click one and it loads a working prompt you can modify. If you're new to Firefly, this is the fastest way to understand what a good prompt looks like without writing one from scratch.
Further down is a recommended section that varies between users, with tabs for trending, image, video, audio, boards, and gallery. The gallery is worth a look: it's other people's submissions, and clicking Remix on any of them loads their prompt so you can adapt it. Filter by images or videos using the toggles.

Homepage Prompt Suggestions
Image Generation and Editing in Adobe Firefly
Hovering over Image in the left panel pops out a submenu with upscale, remove objects, and expand background.
Clicking through gives you the fuller set: generative fill, generate image, create a sticker, character generation, remove people, and a headshot generator.

Adobe Firefly Image Menu
Choose Generate Image and you get the main window. Down the side you'll find:
Model selection (Firefly models and partner models)
Aspect ratio
Resolution
A Google Search toggle
Reference image upload
Your prompt goes in the box at the bottom. There's a prompt features option, and Firefly shows you the credit cost before you commit — worth watching if you're on a limited plan.
The beta toggle at the top of this window is how you switch into Studio.

Toggle on Adobe Firefly Studio Beta
Video Generation and Editing
Video follows the same pattern: generate video, prompt to edit a clip, or edit an existing video, with a gallery of other people's work below.
The generation window mirrors the image one, with a few extras. Alongside model, resolution, and aspect ratio, some models expose a frames-per-second option and a duration control. There's an audio toggle to include or exclude generated sound.
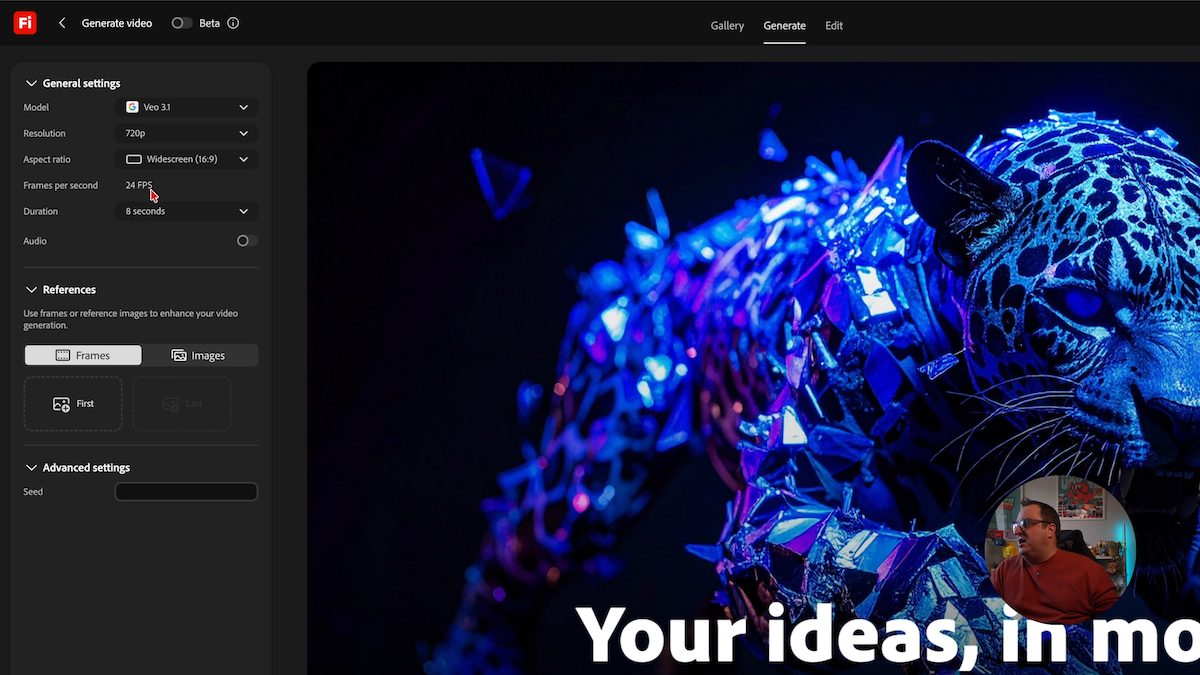
Adobe Firefly Generate Video Settings
You can attach a reference image, or specify a first frame to start the video from — useful when you need the clip to begin from a specific composition rather than whatever the model invents.
Credit cost is displayed before generating here too.
Audio: Speech, Sound Effects, and Music
The audio section covers three generation types:
Speech — including text to avatar
Sound effects — via text prompt or by recording your own voice
Music — full soundtrack generation
There are also video translation and speech enhancement tools tucked in here.
The voice-driven sound effect option is easy to miss and genuinely useful: rather than describing a sound in text, you make the noise yourself and Firefly generates a clean version of it.

Audio Options in Adobe Firefly inc Music, Speech and Sound Effects
Firefly Boards
Boards is an ideation space — somewhere to build out concepts and storyboard visually before committing to final generations.
It's one of my favourite parts of Firefly, and for you to get the most from this area, it deserves its own Firefly Boards Walkthrough rather than a simple paragraph here.

Adobe Firefly Boards
Timeline Editor
The Timeline editor is a full video editor inside Firefly, and it brings your video, image, and audio projects together in one place.
Without it, you'd generate video in Firefly, generate audio in Firefly, then export everything and assemble it somewhere else. With it, you generate and edit in one place.
A looping video I built recently in Firefly used multiple video layers, generated sound effects, a generated voiceover, and a generated soundtrack — all created inside Firefly and assembled on a single Firefly timeline. You can drop in image stills alongside video clips on the same timeline.
I walk through building that video start to finish in this Firefly Timeline tutorial.

Adobe Firefly Timeline Editor Project
Firefly AI Assistant (Beta)
The AI Assistant is broader than it first appears. Rather than editing a single image, it uses tools across Creative Cloud—converting to vector, building brand kits, generating PDFs from data, batch-editing photos, and creating on-brand mockups and social variations. You describe the outcome, and it selects the tools.
I have a walkthrough of the Adobe Firefly AI Assistant on my YouTube channel.

Adobe Firefly AI Assistant Homepage
Production
Production handles bulk actions across multiple files — background removal, cropping, and colour grading.
Each action offers downloadable samples, so you can test the behaviour on Adobe's files before running it across your own batch. If you process volume — event photos, product shots, social variants — this is the section that saves the most time.

Creative Production for Bulk Actions
Custom Models
Custom Models lets you train Firefly on your own datasets.
The important detail: models trained here stay within your own account. Your work isn't shared back to Adobe or folded into their training data. If you've been hesitant about generative AI on brand or client work for exactly that reason, this addresses it directly.
Files
Files is the catch-all: elements, projects, individual files, full generation history, and favourites.
Favouriting matters more than it sounds. Once you've generated for a while, the history becomes unmanageable, and favourites are how you find that one good generation again when you want it on a timeline three weeks later.
Frequently asked questions
Where is Firefly Studio? On the home page, or via the beta toggle at the top of the image and video generation windows.
What are Elements in Firefly Studio? Saved characters, locations, or objects that you reference with @ in your prompts to keep generations consistent across multiple images or clips.
Can I edit video inside Adobe Firefly? Yes. The Timeline editor supports multiple video layers, image stills, sound effects, voiceovers, and music tracks.
Does Adobe train on my custom models? No. Custom models are stored within your own account and aren't shared with Adobe.
How do I see what a generation will cost? Credit cost appears in the generation window before you generate, in both the image and video sections.
If there's a part of Firefly I haven't covered here, let me know in the comments and I'll put together a dedicated walkthrough.